- 1a 0) take it to the bath room to make it wet 0.5) take it back and open the windows 1) turn the solder machine on. 2) I would wait for a few minutes for it to get heated up 3) I put solder on and see if it melts 4) if it doesn’t melt wait, if it does I wipe it with the wet sponge and make the tip look shiny
- 1b 1) I would turn it off. 2) wipe the tip with the sponge. 3) put it back to the hold 4) make sure nothing flammable is near the solder machine if
2a) make sure we switch to the correct measuring units, and make sure the positive end line is connected to the right input’ - 2b) the power IV=0.25 W and so I=0.25/9.25 and so R=9/(0.25/9.25)=342.25 ohm the closest is 470 and its actually 461 so MEASURED current should be I=V/R=9.25/461=0.02A and its measured as exactly as calculated
- PART 3 i1=9.26/(1/(1/1000+1/1000+1/2200+1/3300))=0.0255mA i2=9.26 or you can do it like i2+i2+i3+i4+i5= 9.26/1000+9.26/1000+9.26/2200+9.26/3300 MEASURED 0.026A MEASURED i2 0.009A i3 0.009A i4 0.004A i5 0.003A so i2+i3+i4+i5=0.25A damn pretty close
- Now trouble shoot! When soldering the board is black don’t stay too long on it
Lab Report #2
3 random resistors
#1
Color codes: yellow purple red gold
Stated resistance value: 4.7k ohm
Tolerance: 5%
Min/max possible resistance: 4.5/4.9k ohm
Actual measured resistance: 4.62k ohm
#2
Color codes: orange orange red gold
Stated resistance value: 3.3k ohm
Tolerance: 5%
Min/max possible resistance: 3.1/3.5k ohm
Actual measured resistance: 3.18k ohm
#3
Color codes: red red red gold
Stated resistance value: 2.2k ohm
Tolerance: 5%
Min/max possible resistance: 2.09/2,31 k ohm
Actual measured resistance: 2.17k ohm
2) three resistors listed as 22k 47k 47k
measured 21.5k 44.4k 42.2k
CALCULATED SUM RESISTANCE 22k+47k+47k=116k
MEASURED SUM RESISTANCE: 114.0k

3)
three resistors listed as 22k 47k 47k
measured 21.5k 44.4k 42.2k
CALCULATED RESISTANCE: 1/(1/42.2+1/44.4+1/21.5)=10.78 ohm
MEASURED RESISTANCE: 11.21 ohm

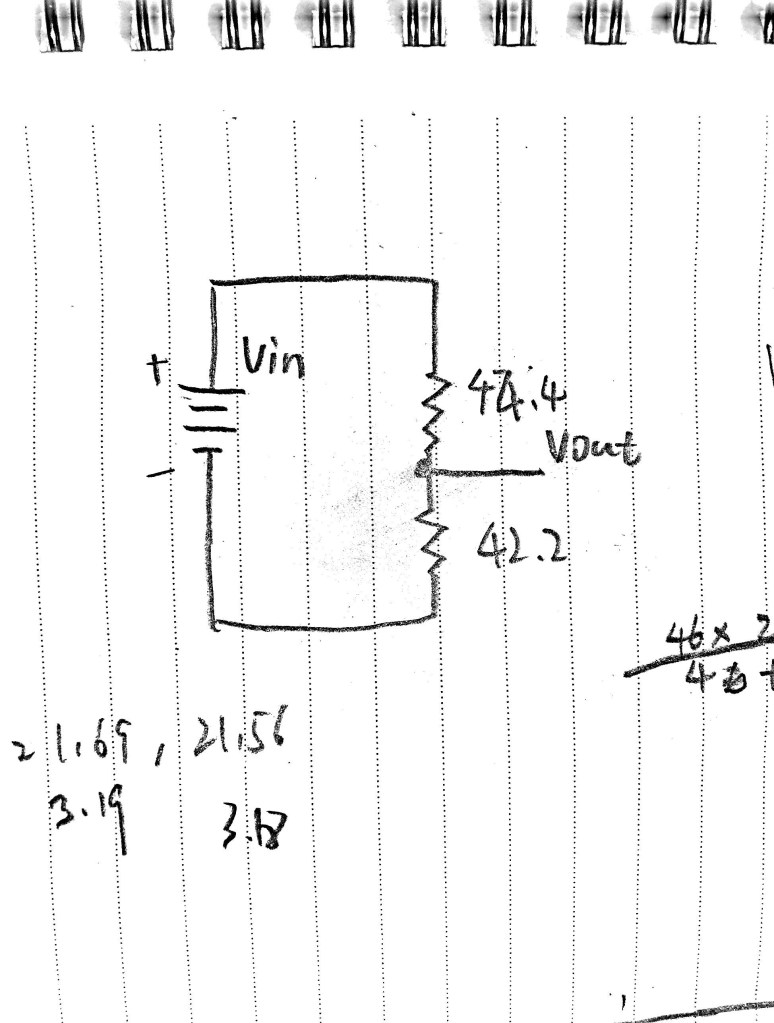
4)
STATED: 47k, 47k
MEASUReD RESISTANCE: 44.4k , 42.2K
CALCULATED 44.4/(44.4+42.2)*9.56=4.90 v
MEASURED 4.77 v
5)
three resistors listed as 22k 47k 47k
measured 21.5k 46.0k 48.2k
CALCULATION: (46*21.5)/(46+21.5)+48.2+21.69+1/(1/21.55+1/45.96+1/21.56)=93.24 ohm
MEASURED:91.7 ohm
6)
CALCULATION: 21.69/91.7*9.56= 2.26v
MEASURED:2.26 v
7)
MEASURED RESISTANCe
R1 21.5 ohm
R2 21.69 ohm
R3 21.56 ohm
CALCULATED:
v1 21.5/(21.5+21.69+21.56)*9.56=3.17V
v2 21.69/(21.5+21.69+21.56)*9.56=3.2V
v3 21.56/(21.5+21.69+21.56)*9.56=3.18 V
MEASURED voltage:
V1 3.15 v
V2 3.19v
V3 3.18v
HELL all of this is accurate
troubleshoot:
no nothing
lab reprot #1
Hi I am Tiankai.
Here’s the link to the video of the circuit built.https://youtu.be/sHIuKKqgosk
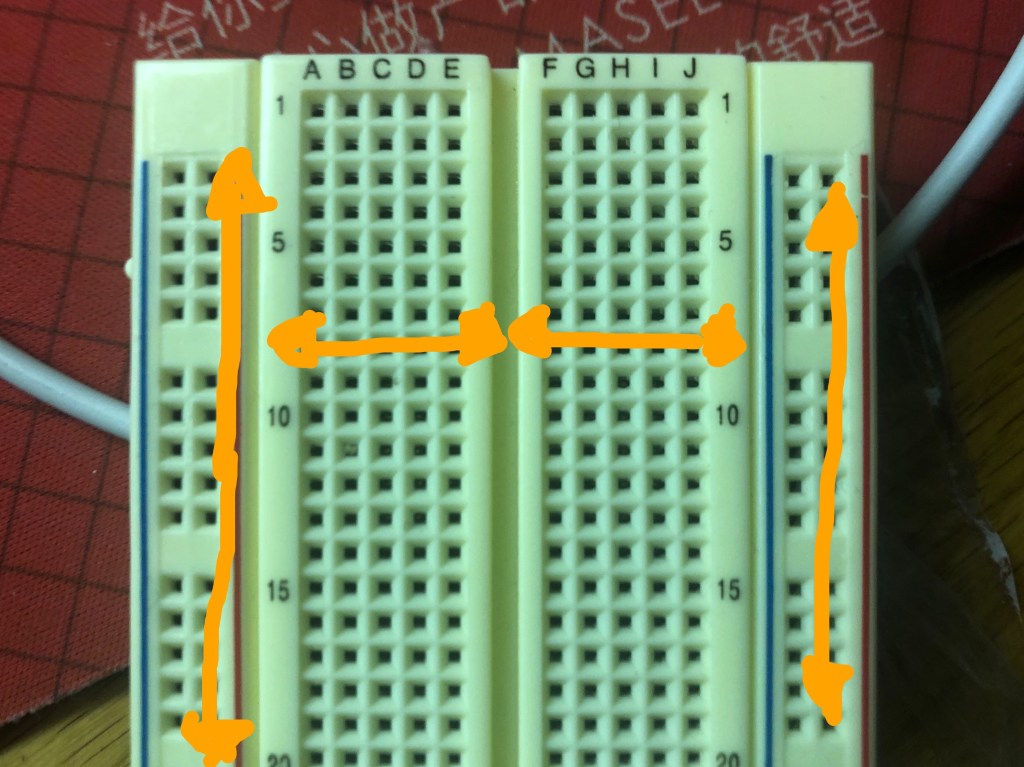
Part 1: how breadboard works
On the left and right theres power rail (beside red line) and blue rail (beside right line). Battery Positive go to power rail and negative go to ground rail.
The center areas are connect through rows. So in current flows through the same row.
Part 2:
Below is the schematic graph:
Part three: multimeters:
So a multimeter can be used to test voltage, current, and resistance. It is composed of two test coils. the current should be flowing into red coil and goes out to black coil. And thats why red coil touch positive, and black on negative when testing. (It could go opposite, it’ll show the exact number but negative). It’s exactly precise in measuring.
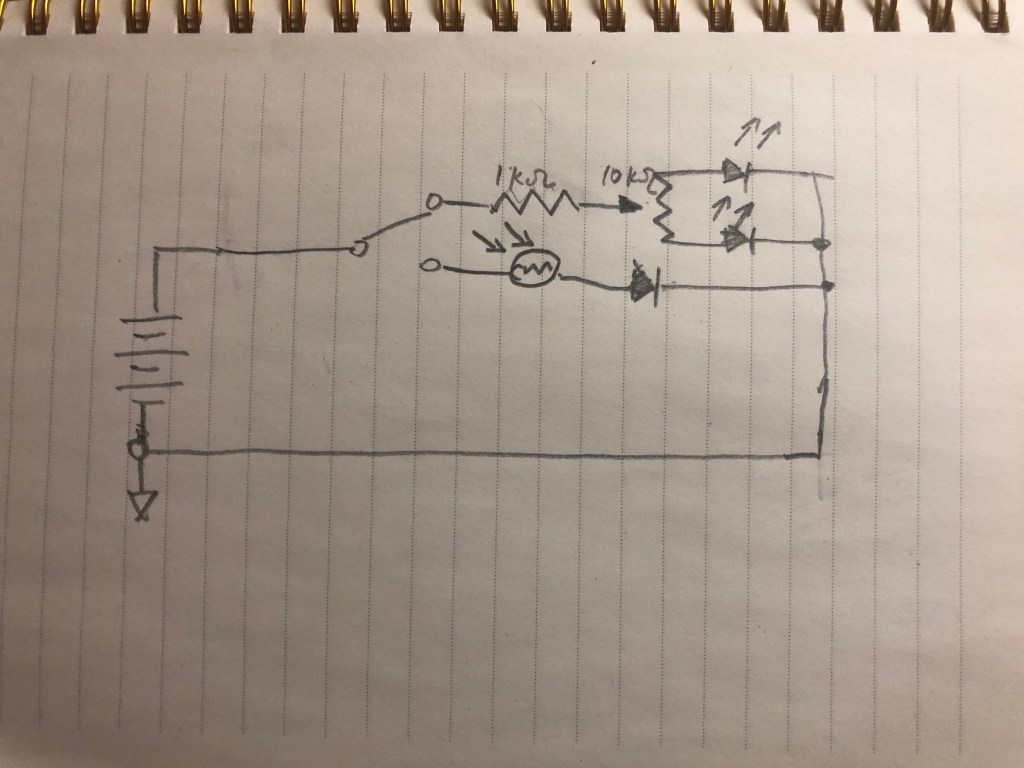
Part 4: Analog Circuit Troubleshooting Notes (in memory):
1. One LED popped. I was trying to set up LED that controlled by light dependent resistance. I wired the resistance to the same row, so the flow didn’t go through it (it went through the grid, which has lower resistance). Solved by wiring to a different row.
2. Potentiometer didn’t work. I put it horizontal. Solved by putting it vertically.
Part 5 Good project ideas
Tia’s Boss amp is pretty cool. But the thing is that the recording sounds pretty much just like a distortion plugin, which really doesn’t sound like a amp, because the high frequency noise. The video sounds pretty legit though.
Paul’s guitar pedal is great, and the recording really sound like one. The oscillation really gives the warmth.
Sean Porio’s Nastifier deliver a high quality of sound too.
lab report 1
hi
我的第一篇博文
做自己,因为别人都在做自己。
– Oscar Wilde
这是我新博客的第一篇文章。我刚开始写这个新博客,因此请继续关注。在下方订阅,以便在我更新新文章时您会收到通知。
自我介绍(示例文章)
这是一篇示例文章,最初作为 Blogging University 的组成部分发布。报名参加我们十个项目中的其中一个,立即开始撰写您的博客。
您今天要发布一篇文章。不必担心您的博客的外观。如果您还没有给博客命名或是感到不知所措,也不必担心。只需点击“新文章”按钮,告诉我们您来此处的原因。
为什么要这样做?
- 因为它能为新读者提供背景信息。让他们了解您是做什么的,他们为什么应该阅读您的博客。
- 因为这将帮助您专注于自己对博客的想法,以及您想用博客来做什么。
文章可短可长,可以是对您的生活的个性化介绍或是博客宗旨说明,也可以是对未来的宣言或是对希望发布的内容类型的简要概述。
为了帮助您开始撰写,不妨思考以下几个问题:
- 您为什么要公开写博客,而不是写个人日记?
- 您认为您会写些什么话题?
- 您想通过博客和谁联系?
- 如果您的博客成功写到明年,您想要达到什么目标?
您并非一定要受此限制,博客的一个奇妙之处在于,随着我们学习、成长和与他人互动,它们是会不断演变的,不过如果知道从何处入手以及为何开始,这将会颇有益处,并且明确您的目标可能会激发您写其他一些文章的灵感。
不知道如何开始?只需写下您脑海中闪现的第一件事即可。Anne Lamott 是一位作家,大家都喜欢她写的书。她指出,你要允许自己写出“蹩脚的初稿”。Anne 提出了一个很好的观点,先开始写,之后再去考虑如何编辑。
在您准备发布时,给您的文章贴上三到五个标签来描述您博客的关注点 – 写作、摄影、小说、育儿、美食、汽车、电影、体育等。这些标签将帮助关注您话题的人在阅读器中找到您。确保添加“zerotohero”标签,这样其他新博主也可以找到您。
